

Legacy Manual
Named Configurations
So, we know that PingPlotter Pro allows us to trace to multiple targets in the same instance. What if, however, we want to use different settings on different targets? For instance - for one target we want to use TCP packets, but want to use ICMP packets on another. Or maybe you want to trace a few of your targets from a remote agent location.
The good news is PingPlotter Pro can do this through the use of “.” The bad news? There is no bad news - this is all very good stuff.
We can access (as well as create and manipulate) our named configurations in PingPlotter by going to the “Options” menu (“Edit” -> “Options”). When you first install PingPlotter you’ll have one named configuration (appropriately named “Default Settings”). Under the configuration name we see a number of other “configuration specific” areas (such as “Display,” “Engine,” “Auto-Save,” and “Route Changes”). The values that we configure in these areas are all a part of this specific named configuration. At any time, we can edit the name, or make chances to any of the values.
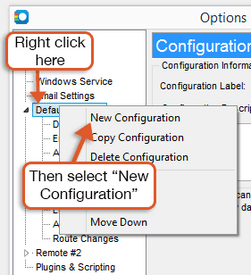 To create a new named configuration, all we need to do is right-click on any existing configuration, and then select “New Configuration.” If you’ve got a configuration already set up, and need to set up another that’s similar (with minor tweaks), you can right click on that configuration and select the “Copy Configuration” option. Any changes that you make to a specific configuration are *not* carried over to any other named configurations.
Once we’ve created a new configuration, it’s always a good practice to rename it (and give it a good, meaningful name). Some example configuration names could be:
- TCP Port 80
- Auto-Save every 30 minutes
- VoIP
- Remote via our website
There’s also an option to enter a description - which can prove helpful (in case you come back to a configuration and wonder why it was made, and what it was for).
Once you’ve got everything set up to your liking, and close down the “Options” menu, you’ll notice a drop-down box below your “Address to Trace” area labeled “Settings.” This field lists all of the named configurations we have set up.

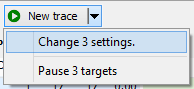
Changing this drop-down will change the currently running target to use that named configuration. You can change multiple targets to use a specific configuration by selecting them on the summary screen, changing the settings field, and then click on the drop-down menu next to the "New Trace" button and select "Change Settings."
The "Summary" screen's display settings come from whatever configuration is first in the list. To make a configuration work on the summary screen, move it to the top of the list using the right click menu. Using the "Set as default" option from the menu moves the selected configuration to the top of the list. The configuration at the top of the list is the default configuration.
**The feature in this topic is exclusive to PingPlotter Pro. See our product comparison page for more details**