Engine Options

The "Engine" settings control what and how PingPlotter sends data.
Packet Type
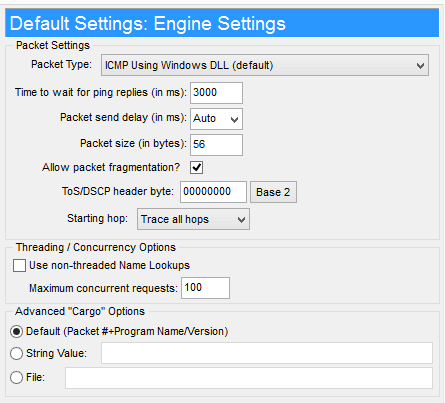
The "Packet Type" settings allows you to pick what kind of data you want to send to tailor PingPlotter to your network needs. PingPlotter supports 4 packet types:·
- ICMP using Windows DLL. This method is the traditional method and matches the data that the Windows TRACERT command uses. It works on all Windows operating systems, and is a good balance of reliability and capability. This is reliable with the least CPU usage (on most operating systems). This method will automatically do manual timings on less-than-accurate operating systems to attempt to get accuracy to 1ms. This method does not require administrative rights, and should be the first choice for most users.
- ICMP using Raw Sockets (advanced use only). In some rare cases, the standard Windows method doesn't work. PingPlotter can compose its own ICMP packets - although in most cases this is no more reliable or better than ICMP.DLL. This requires administrative rights, and doesn't work reliably on Windows Vista or newer (including Windows 8).
- UDP Packets (Unix-Style). This uses ports 33434 – 33500 and closely mirrors Unix’s traceroute command. This method will sometimes allow you to trace to a destination that isn’t reachable via ICMP, or might allow you to reach the internet even if your ISP is blocking ICMP echo requests. Though not the cure-all for "Destination Unreachable" issues, this is worth a try, especially if you’re getting erratic packet loss or unreachable destination. This requires administrative rights, and doesn't work reliably on Windows Vista or newer (including Windows 8).
- TCP Packets. This method gives you the opportunity to send TCP packets. If a firewall is blocking ICMP packets, it’s sometimes possible to get a response using TCP packets instead. TCP is the protocol used for all web browsers in addition to FTP, Telnet and others. This requires Administrative user rights, and on most operating systems also requires a helper library.
Timeout Speed
This option allows you to fine-tune your performance a little. When PingPlotter sends out a packet, it waits a certain amount of time for a response. The longer it waits, the more resources it needs to use (to keep sockets open), but the more likely that it will get a response By default, PingPlotter will wait for 3 seconds for any packet to return. If the packet doesn't return in 3 seconds, then it is counted as a lost packet. If patience isn't one of your virtues, you can turn this down somewhat. No matter what your value is here, timed out packet will show with the time "9999."
Because of the performance enhancements offered by PingPlotter, it's unlikely that this option needs to be changed. If it's set too low, it can cause misleading data to be generated.
Time interval between hop traces
This can be an interesting number to manipulate. It's really meant for "advanced" users, so you don't NEED to change it.
PingPlotter sends out multiple packets at the same time and times everything at once. Actually, it leaves a tiny interval between each packet so as not to completely saturate your bandwidth when it sends out 30 packets. This time interval is adjusted by this parameter. Most of the time, 25ms is good. This falls within realm of what a 28.8 modem can perform. If you've adjusted your packet size, or your connection to the internet is really slow, you might want to crank this number up a little. If you have just oodles of bandwidth, you can crank it down a little. Be aware that a too-small number can adversely affect your data.
Packet Size
The Packet Size can make a considerable difference in latency performance. Normally, you want to use a relatively small number here. The default is 56 bytes, but in some cases you might need to lower this (especially on TCP port 80 packets, which sometimes get dropped unless they are 40 bytes). 1500 is lot of data, and should be used with great care. A 1500 byte packet means PingPlotter will be sending out 30-50 K per second worth of data, which can cause its own problems (and makes measuring latency more challenging).
ToS/DSCP header byte
This is relatively advanced course material – ie: if you don’t know what this means, just leave it at 0.
The DSCP byte is often used by network providers to determine packet priority and sometimes make other decisions about the data. There may be an occasion where you want to manipulate this byte and test network performance. VoIP data, for example, is often characterized by a value in the DSCP byte.
This byte can be edited as Decimal, Hex, or Binary by hitting the button beside the edit field. The display on the button shows the current format this value is displayed in.
Note that under Windows XP and newer operating systems, a registry setting needs to be modified to allow this byte to be used. This is a system-wide setting that allows applications to write their own values into this byte. If your system needs to have this value set, PingPlotter will prompt to see if you want this setting changed (and a reboot will be required) as soon as you modify the value in this field.
Starting Hop
Sometimes hop 1 or 2 might never respond. Rather than continuing to pound away at these hops and never getting a response, it sometimes makes sense to just ignore the first hop or 2. This is totally normal on lots of cable modems, and can happen on any connection – where the first hop is always "silent". Ignoring the first non-responding hops will save some resources.
TCP Specific Settings
When using TCP packets, you can specify which target port to use. Usually, you’ll want to use port 80 here, but you’re welcome to use any reasonable port. Windows firewall blocks creation of TCP packets, so you’ll need to use WinPCap to create packets under that OS (and possibly others).
Use non-threaded Name Lookups
This makes PingPlotter do all DNS lookups in the main application thread. If you’re having DNS lookup problems, it might be worth trying. Some older Windows OS versions (Windows NT) may not like multiple name lookups being done. This also turns on a separate lookup if you're doing single-threaded tracing.
Maximum concurrent requests
PingPlotter sends multiple requests simultaneously, but we need to put a limit on it so we’re not queuing more packets than we can send. Set this to 1 to only have one request out there at once. For ICMP types, this is concurrent *threads*. For UDP and TCP (which share a single thread for all packets), this is requests.
Setting this too high can cause PingPlotter to crash, especially on old operating systems. 45 is proven safe. If you have a really fast trace interval, you may need to increase this number to support the trace interval. Usually, you want to lower the "Timeout Speed" setting before raising this, as that might be adequate.
Cargo
Note: This is an advanced option that should probably not be changed. This is used to diagnose network problems when specific *data* is sent - which is a highly unlikely problem for most networks.
By default, PingPlotter (basically) pads the outgoing packet with repeating string representing the current PingPlotter version and name. An example of this is PingPlotter250, repeated over and over to fill the cargo. If you suspect that your network may be having problems when you send specific byte codes, you can enter the hex code that you want repeated, OR a link to a file to read the byte string from. The cargo space for the packet will be padded with this data. Use this in conjunction with the packet size to create the network scenario you're looking to duplicate.
**Some of the features listed in this topic are only available in PingPlotter Pro and/or PingPlotter Standard. See our product comparison page for more details**

