Version 5 Manual
Examples and Templates
In this section, we will demonstrate how someone could use a PingPlotter alert for their workflow.
Additional options
Methods with a # mean you can edit the parameters within the quotations. You can also customize how line items show up by wrapping them in HTML header tags.
Examples
Modify summary to automatically show/hide targets based on network conditions:
- Create a new summary - for example, "Bad Connections"
- Create a new alert with the Modify Summary action and specify your conditions
- On the following page, choose the option to Add target to the "Bad Connections" summary for the event When conditions start
- Before hitting the Finish button, click the green Add Action button
- Create another Modify Summary action, choose the option to Remove target from the "Bad Connections" summary for the event When conditions end
- At the top of the alert panel, give your new alert a name and click Finish
Send an email with trace data to notify personnel when a target goes offline & comes back online:
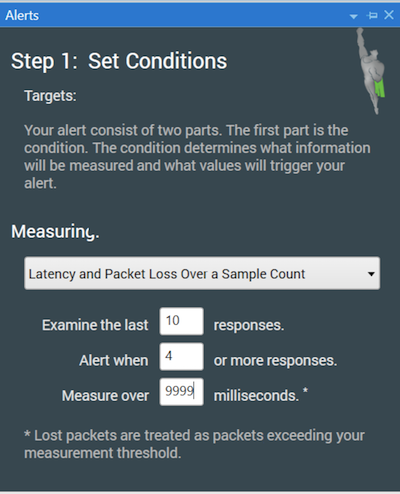
- Create a new alert with the Send an Email action and specify your conditions in a similar fashion to this:

A lost packet always exceeds any number you enter in the threshold area, so if you want to consider only explicitly lost packets, set this to 9999 milliseconds. If you want to consider any really high latency packets as well, set this to something lower (like 1000). This screenshot only examines the last 10 packets, but you can change this to whatever you'd like it to be. For instance, set Samples to examine to 100 and Alert when to 20 or more samples are over 9999 milliseconds. This will alert you when you hit 20% packet loss over a period of approximately 4 minutes (depending on what trace interval you use).
- Choose the When conditions start event
- Enter an email recipient. Separate multiple recipients using a comma like so: support@pingman.com, sales@pingplotter.com
- Use a Subject Template that includes a variable and that will catch someone's attention, like:
{{ Host.PreferredName }} is OFFLINE!
- In the Message Template, you can use a combination of text, HTML, and variables to specify what you'd like the email to contain:
<h2>Alert " {{ AlertName }} " fired for {{ Host.FullDisplayName }} </h2> {{ #attach_data '{of_last:"60 seconds minutes",samples:35}' }} <img src=" {{ #attach_timegraph '{of_last:"60 seconds",width:1400,height:400}' }} " />
- Click the green Add Action button
- Choose the When conditions end event
- Use a Subject Template like:
{{ Host.PreferredName }} is back online!
- In the Message Template, you can use a combination of text, HTML, and variables to specify what you'd like the email to contain:
<h2>Alert " {{ AlertName }} " fired for {{ Host.FullDisplayName }} </h2> {{ #attach_data '{of_last:"60 minutes",samples:2000}' }} <img src=" {{ #attach_timegraph '{of_last:"60 minutes",width:1400,height:400}' }} " />
Execute REST Call to notify a team in your company channel:
- Create a new alert with the Execute REST Call action and specify your conditions
- Choose the When conditions start event
- Follow this guide to help set up a webhook for your company chat tool
- Enter your tool's Rest Address
- Change the method to POST
- Use Json as the content data-type
- Type in your JSON request into the Body.
- Please note that each API schema is different - check with your tool's API documentation for more information.
- As an example, here is what the Body could look like:
{"text":" {{ Host.HostName }} is experiencing high latency!"}
Summary of data on a timer:
- Create a new alert with the Send an Email action
- Under Measuring, choose the option for Alert on a Timer. Set this to 24 hours
- Enter an email recipient. Separate multiple recipients using a comma like so: support@pingman.com, sales@pingplotter.com
- Use a Subject Template that includes a variable and will catch someone's attention, like:
DAILY SUMMARY for {{ AgentName }} to {{ Host.PreferredName }}
- In the Message Template, you can use a combination of text, HTML, and variables to specify what you'd like the email to contain:
<h2> Alert " {{ AlertName }} " for {{ Host.FullDisplayName }} </h2>
<img src= {{ #attach_image '{of_last: "24 hours", width: 1400, height: 400}' }} />
{{ #attach_timegraph '{of_last: "24 hours", width: 1400, height: 400}' }}
{{ #attach_data '{of_last: "24 hours"}' }}
Templates
Modify Summary:
- Alert Type: Modify Summary
- Condition Measuring: Latency and Packet Loss Over A Sample Count : 60min | 100ms | 10%
- Notify when: Alert conditions start | Add to Summary: "Bad Connections"
- Add Action → Modify Summary
- Notify when: Alert conditions end | Remove from Summary: "Bad Connections"
Send an Email:
- Alert Type: Send an Email
- Condition Measuring: Latency and Packet Loss Over Time : 10min | 250ms | 5%
- Notify when: Alert conditions start
- Subject Template: Poor connectivity to
{{ Host.PreferredName }}
!
- ---Message Template---
<h2>Alert " {{ AlertName }} " fired for {{ Host.FullDisplayName }} </h2>
{{ #attach_data '{of_last:"60 seconds",samples:100}' }}
<img src=" {{ #attach_timegraph '{of_last:"60 seconds",width:1400,height:400}' }} " />
- ---Message Template---
- Add Action → Send an Email
- Notify when: Alert conditions end
- Subject Template: Connectivity to
{{ Host.PreferredName }}
has improved!
- ---Message Template---
<h2>Alert " {{ AlertName }} " fired for {{ Host.FullDisplayName }} </h2>
{{ #attach_data '{of_last:"60 minutes",samples:2000}' }}
<img src=" {{ #attach_timegraph '{of_last:"60 minutes",width:1400,height:400}' }} " />
- ---Message Template---
Execute REST Call:
- Alert Type: Execute REST Call
- Condition Measuring: MOS (Mean Opinion Score - VoIP quality) : 4 | 10 minutes | 5 samples
- Notify when: Alert conditions start
- Rest Address
- Change the method to POST
- Use Json as the content data-type
- ---Slack Message Template---
{"text":" {{ AgentName }} is experiencing poor call quality!"}
- ---Slack Message Template---
Send an Email:
- Alert Type: Send an Email
- Condition Measuring: Alert on a Timer: 24 hours
- Notify when: Alert conditions start
- Subject Template: Daily trace summary from
{{ AgentName }}
to
{{ Host.PreferredName }}
- ---Message Template---
<h2> Alert " {{ AlertName }} " fired for {{ Host.FullDisplayName }} </h2>
<img src= {{ #attach_image '{of_last: "24 hours", width: 1400, height: 400}' }} />
{{ #attach_timegraph '{of_last: "24 hours", width: 1400, height: 400}' }}
{{ #attach_data '{of_last: "24 hours"}' }}
- ---Message Template---

