Using PingPlotter
How to Pre-Qualify Remote New-Hire Networks

One of the more time-consuming and costly tasks for any IT team is setting up the remote working space of a new hire. Every remote worker has a different location, a different computer and a different ISP — some with spotty internet connections at best.
“We want to be able to monitor them at home to see if they are having problems before they start taking calls,” says Chris Georgeson, Director of Technology for Ruby Receptionists. “While they are in training, we can tell them their internet is not so great and they should call their ISP.”
Maximize New-Hire Uptime on Day One
With PingPlotter Cloud, you can evaluate remote-worker networks before you even hire them — ensuring they are ready to work on Day One. PingPlotter monitors agent internet connections a staggering 34,560 times a day. It captures more issues than a single-point-in-time speed test — super-duper quick and without interrupting agent workflow.
Here’s our simple, step-by-step guide on how to pre-qualify remote new-hire networks. Anyone that knows red means “stop” can use it — and that’s just about everybody.
1. Deploy an Agent on the New Hire’s Computer
- First, click on Agents located in the left sidebar menu.
- Then select Create Agent. Name this Agent using the first and last name of your new hire, then hit Create.
- Add Targets to the Agent. Use the default 8.8.8.8 Google DNS unless you have a specific target to use.
- Copy the Installer Link and send it to your new hire.
- Your new hire simply needs to open the link, then download and run the Agent Installer.
- Once installed, the Agent will appear as “online” on your dashboard.
One of the best features about our new Cloud dashboard is that you can customize your widgets any way you like. On top of keeping track of important metrics — like latency, packet loss, jitter and mean opinion score (MOS) — you can filter data by time (ie: the last 24 hours), region (city, state), and carrier (ISP). A contact center, for instance, can filter their remote-agent internet carriers by region, so they can focus their hiring based on the area of the country with the best internet quality.
Learn how to create a group field in PingPlotter, so you can see all of your new hires in one spot.
2. Collect the PingPlotter Data
PingPlotter will begin collecting data as soon as it is installed and online. Note: The new-hire’s computer will need to remain awake and online. Since most network issues happen at irregular intervals and are tough to catch, we recommend you allow the Agent to collect data for at least 24 hours. PingPlotter alerts will instantly notify you when the new-hire network starts to experience connection issues.
3. Analyze Using Insights
After 24 hours, it's time to drill down to the details, so you know if the new-hire’s home network is working properly.
- Go to Quality Monitor on the left sidebar menu.
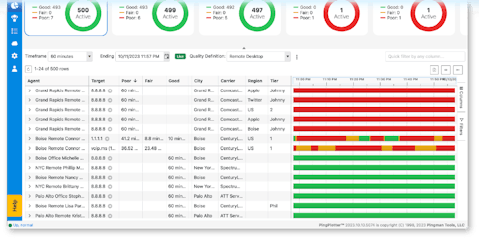
- Select the All Agents card and locate the new hire in the table below.
- Click on the new hire’s name and tap View Insights.
Insights, our PingPlotter AI, automatically detects potential problems, ranks them in order of severity and suggests how to resolve them.The Signal Quality Summary will tell you what percentage of time the new-hire connection was good, fair, or poor.
Along with determining signal quality, Insights will find three most significant events. These are shown as event cards and highlighted in purple on the timeline graph. In each event card you'll find:
- Date, time and duration of the event.
- Quality score percentages during the event.
- Average latency, packet loss, jitter, and MOS.
- Possible causes of the problem, such as local bandwidth saturation. To get more details, click on the event.
4. Share the Results with LiveShare
If the PingPlotter results came back negative, you can use LiveShare to send them to whoever is responsible for resolving the issue. LiveShare lets you generate a customized trace results page, add comments, and then send it to your IT team, new hires, or upper management. Anyone with the URL can view it and you can save it on your workforce management software to reference later.
To use LiveShare:
- Click on the Share button at the top of the Target View page.
- Select LiveShare.
- Give your LiveShare report a name, expiration date and add your comments.
- Select Create and then Send.
Keep On Monitorin’
Remote-worker networks constantly change, so make sure that you monitor them with PingPlotter daily. We recommend the following minimum requirements for new-hire internet:
Latency: less than 120ms
Jitter: less than 20ms
Packet Loss: less than 0.5%
MOS: more than 4.0
Any values out of these ranges and you will start having connection issues.
Hop-PING on the Path to Success
Pre-qualifying remote new-hire networks can save a lot of headaches down the road. PingPlotter will show you who already has a good internet connection and who needs some problems fixed (think ISP) before their first day. Plus, you’ll have a record of these issues, so you can avoid future downtime and set your new hires on a path to success.
Do you support remote workers?
When remote workforces have connection trouble PingPlotter Cloud helps you find the problem and get everyone back online fast.

